25-step music production process checklist and video workshop >>>
How to Master Music - Discover Audio Mastering Techniques & The Steps Involved With Mastering Music So You Can Make Your Tracks Shine!
It's Good to Know How to Master Music...
You may ask yourself; "Why would I need to learn how to master music?"
The truth is, as you can imagine, that you don't. In fact, your best option will always be to send your tracks of for professional mastering done by an expert engineer who specializes in your particular genre. Nowadays you also have the extra option of using automated online mastering services if, of course, it works for you.
That said, there are times when you just want to get your track up to a decent level fast and decide that professional mastering doesn't make sense in your situation. You may not have the budget or the time to send your track off to a pro engineer. You may even want to properly learn how to master music so you can keep the entire music production process under your control from start to finish.
One often overlooked benefit of learning how to master music is that you'll start to mix with mastering in mind. So, by knowing what will be done during mastering you'll actually improve your mixes.
In this guide you'll discover the basic audio mastering techniques used in music mastering as well as some tried and tested audio mastering tips and tricks to help you get the professional sound you want. You'll also uncover a few great mastering tools to make the process easier and faster.
Before We Get Started With the Details of How to Master Music, A Few Friendly Words of Warning...
When you first start to learn how to master music, you may want a step-by-step guide. Now, while it's possible to lay out the basic steps for you, you have to keep some important things in mind:
- Every track is different, so cookie-cutter approaches to mastering won't really work.
- Great mastering depends on your ability to hear what you're doing, so a well-designed, acoustically-treated listening environment will make the whole process much faster and easier.
- Knowing what works and what doesn't is a skill that comes with practice, so don't be discouraged if at first you don't get the results you want. Just accept good enough and master more tracks to get better.
This guide will provide you with the different processes most often used during the mastering process. In time you'll start to get a feel for which processes are needed and develop a mastering workflow that suits your specific needs in the studio.
OK, preamble over! Now let's dive into how to master music...
Where Great Mastering Starts...
You may already know the golden rule of sound engineering:
Garbage In = Garbage Out
In other words, you can put lipstick on a pig but it's still a pig.

Now, while a great mastering engineer can work wonders and turn a sub-par mix into something at least half decent, it's not the best way to approach mastering.
A great master starts with great source sounds, i.e. good samples, recordings, sound design, followed by great mixing and only then great mastering. So, if you want great masters you have to maintain a great standard all throughout the entire production process of your track. Mastering should really be only the final 5% to 10% of the process that ensures your track is fit-for-purpose and presented to the world in the best way possible.
So, get it right at the source and keep your standards up at every stage of the music production process to make your life easier during mastering and improve your chances of getting the results you want.
Remember the formula...

So, the rest of this guide assumes that you're starting with a great mix with enough headroom to allow you to apply processing and get the track ready for release. Aim for between -6dB to -4dB in terms of peak levels on your mix and be sure to remove any processing, especially your limiter, if you had one on your master bus, before bouncing down your final mix for mastering.
How to Master Music: The 7 Basic Processes Involved
The 7 processes you'll discover below are the most-used during mastering. No voodoo or magic. These are all processes you're likely familiar with if you've been producing music for any amount of time.
Throw a quick glance at the infographic and then read further below to delve deeper into each of the audio mastering techniques listed.
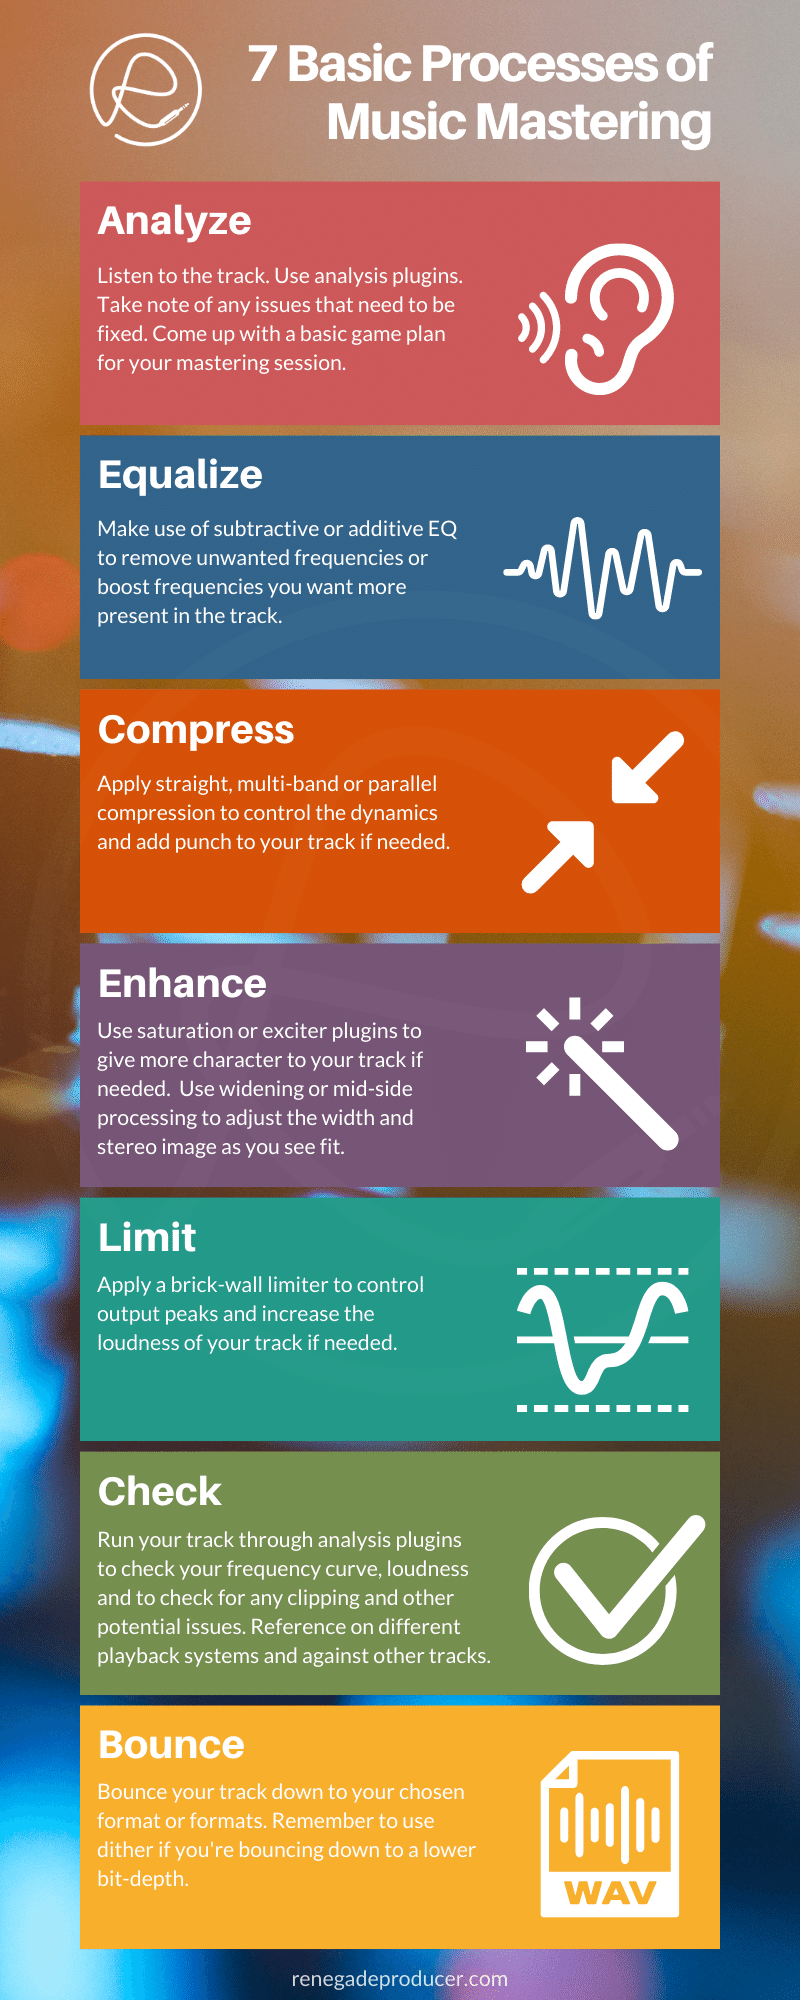
1. Analyze Your Mix
Your first mission when mastering your track is to establish what you're working with and devise a basic game plan for your mastering session.
Start by listening to your mix and take note of any issues you want to fix or enhancements you want to make to the track. Analyzer plugins can also come in handy here if you want a visual representation of the mix.
It's also a good idea to compare your track to similar commercially-released reference tracks in your genre at this point to give yourself some context to work within. Always be sure to match the levels of your reference tracks and your mix so that you don't fool yourself and make wrong mastering decisions because of the difference in levels.
Spend a good amount of time just listening critically to your track, comparing it with your reference tracks and taking notes.
With good notes in hand and a basic strategy you'll be able to move through the mastering process much faster and avoid spinning your wheels. Keep your notes and plan basic. It's just to give yourself a sense of direction for the session.
Your list may look something like this:
- Remove low-end with high-pass.
- Reduce low-mid muddiness with a notch.
- Reduce high-mid abrasiveness with a dynamic EQ.
- Add some air with a high-shelf EQ.
- Improve overall consistency with multi-band compression.
- Increase loudness with parallel compression.
- Accentuate mid-range tone and more bite with saturation plugins.
Now, take a quick break to rest your ears and then come back to start crossing the points off your list one-by-one.
2. Apply Subtractive & Additive Equalization
Equalization may or may not be needed, depending on how good the mix is.
Your EQ moves during mastering should be subtle, 2dB to 3dB at most. If you find yourself making bigger cuts or boosts then your best bet is often to go back to your mixing project and fix the issue there and bounce it out again.
EQ cuts and boosts during the mastering process also tend to work better with wider bandwidth or Q settings than you would use during mixing or sound design. Remember, you're affecting the entire mix with your EQ so keep it broad and keep it subtle.
Dynamic EQ can also be helpful during mastering as it only kicks in when your selected frequency range is actually present. This way you can lightly tap down unwanted frequencies without constantly affecting the entire mix.
Also, keep in mind that EQ can be quite drastic. It's always good to consider your other options during mastering. You could, for example, use multi-band compression to dial in a better overall tone in a more pleasing way than you would if you used an EQ for the job. In the same way you could use parallel compression or distortion to add more body or bite rather than boosting with an EQ.
Different mastering engineers will have their favorite go-to EQ plugins or hardware but, rest assured, you can get the job done with good stock EQs that come with your DAW or any other good EQ plugins.
3. Apply Compression
Compression, when needed, can be an extremely helpful tool during your mastering session.
Maybe your track needs more consistency, or a bit of punch. Even more dynamic range. Compressors are your best friend here!
Which style of compression you use depends on the track. At times you'll want to stick to multi-band compression to hone in on a specific frequency band. Other times you may want to use parallel compression to add body without destroying your transients and dynamic range. Then you could of course add some character to your entire mix with a classic glue compressor. Sometimes it may even need a combo of these compression techniques to get the job done.
It's important to pay attention to the transients, punch and groove or timing of your track when you add a compressor over the entire mix. Longer attack times with faster release times are usually a good starting point when you dial in your compressor settings. Also, keep your ratio on the lower side. Between 1:5:1 and 3:1 is usually the sweet spot.
Multi-band compression can be useful as a way to change the tone of your mix without using EQs over your entire mix. In most cases you'll use just one band of your multi-band compressor to achieve the tonal correction you have in mind. This makes for a more dynamic correction that doesn't affect the entire spectrum all the time as you would with a static EQ over the entire mix.
Parallel compression can be useful to add body or weight to your mix without squashing the living daylights out of your original or dry signal. You can heavily compress your parallel track and then simply blend it with your original track to achieve the tonal balance you want.
4. Apply Some Enhancements
Once you get your basic tone and consistency right you may feel that the track needs that extra something. This is where you make some final cosmetic enhancements to just polish it. Saturation plugins, exciter plugins and stereo width control plugins are the usual suspects that come to mind during this stage of mastering. Subtle level automation can also give you more impact by creating more contrast.
Now, this process is highly optional. You already know by now that mastering should only really be the last 5% to 10% of your process. It's better to achieve the effect you want by using saturation, wideners and automation during mix-down. It's just much more elegant and efficient to apply these enhancements to individual tracks while writing and mixing than it is to try do it when you have one stereo file to work on during mastering.
You'll find 3 great saturation plugins listed here.
5. Throw on a Limiter
The last thing in your mastering chain is usually a Limiter. This is added to control any unruly peaks still remaining in the track. Don't think of it primarily as a tool to increase loudness.
Also, don't think that a limiter is a must. If you have a really good mix a bit of compression might be enough.
That said, most of the time a limiter is used during mastering.
Limiting, as with all other mastering processes, is best applied with subtlety. Again, don't rely on your final brick-wall limiter to handle the job of making your master loud all by itself. You want to stick to 2dB to 3dB gain reduction in most cases. If you find that you need to do more then it's probably best to try and adjust your compression and gain staging earlier in your mastering chain so that you hit your limiter with a better signal.
Check out these 3 great workhorse Limiter plugins if you're in the market for a new one.
6. Do a Final Check
Once you've done all your processing you're ready to do a final check to make sure everything is as good as possible before bouncing. It's an excellent idea to take a quick break to rest and reset your ears before you do your final check.
Now, we all know the "if it sounds good, it is good" cliche by now and to a degree that's correct, but, but, but...
Analyzers and reference tracks are a good idea at this stage, especially if you're not a seasoned mastering engineer.
You'll want to check your loudness, check for clipping, check your phase correlation, check your stereo image and make sure your master is in the same general ballpark as good commercially-released reference tracks in the same genre as your track.
It's also a good idea to check your master on different playback systems to make sure it translates well. Use your car system, different speakers, headphones and earbuds. If the track is meant for club playback and you have access to a bigger system then you may want to check on that as well.
Once this is done you're ready for the final part of your mastering session. Get ready to bounce...
7. Bounce Down Your Master
Congratulations! One final step left and you've got yourself a master.
Now, I'm sure I don't need to tell you how to bounce down a stereo track in your DAW.
So, all I'll add is a reminder to use dithering if you're bouncing down to a lower bit-depth file format. The CD standard is of course 44kHz, 16-bit but with streaming sites you can do higher quality files. In most cases anything above 48kHz, 24-bit is however overkill.
Also, remember to add any metadata you may want to include before you bounce down the final master.
Mastering Myth: It's All About Making It Louder
Sure, a part of the goal of mastering is to ensure appropriate levels and loudness for your releases.
Thinking of mastering as the way to make your tracks louder is however a fool's approach. The perceived loudness of your track should be part of your focus when you write, arrange, orchestrate and mix it, not when you master.
Loudness is achieved way before mastering by using the right instruments playing the right notes. It's achieved by using contrast and dynamic range. It's achieved by adding and accentuating harmonics. It's achieved by balancing your tone with equal loudness contours in mind.
So, if your main goal with mastering is to make your track louder I suggest you take a step back and consider the entire music production process first. Tiny loudness moves during the process add up to get you the perceived loudness you want. Get this 98% right during the earlier stages of the process and, yes, your compression, saturation, limiting or maximizing moves during mastering can give you that last 2% in a pleasing way.
I won't expand too much on this topic here for the sake of brevity. I highly recommend however you read Rob Stewart's post "Loudness in mixing explained" should you want to gain some valuable insight into how to get your mixes and masters to sound louder.
Do You Feel You Need More Training? Take a Good Mastering Course Online to Learn How to Master Music Properly...
Boost your confidence levels during mastering with Production Music Live's "Mastering from Start to Finish" course.
You'll learn everything you need to know to master electronic music, from the basics to more advanced audio mastering techniques and processes.
This course will help you shave a lot of time of the learning process because you'll learn to avoid common mastering mistakes, find out how to prep your mix properly for mastering, uncover the theory behind mastering, delve into compression and EQ techniques and discover how to treat your bass frequencies and much more.
This 5 hour+ video course covers mastering several different styles of electronic music including pop, future bass, techno and other genres.
PML are known for the high production quality of their online video courses which is why I recommend them to any producers who want to fast-track their music production learning. You can learn more and grab "Mastering from Start to Finish" right now via the RenegadeProducer.com affiliate link below:

Online Course: Mastering from Start To Finish
See the entire mastering process explained in detail every step of the way. Learn the basics of how to master music and also more advanced mastering techniques.
Now You Know The Basics of How to Master Music!
No, voodoo or any other dark magic involved. Just basic processes you're already probably familiar with.
Of course knowing how to master music is one thing and actually mastering music well is another. As with most things in life, the more you do it, the better you get. So, don't get discouraged if your first attempts are gruelling and don't come out as you want them to. Keep at it!
Alternatively, remember that a great mastering engineer is a second set of ears, with experience, tools and a listening environment you may not have access to. Also, keep in mind that for a quick, easy and cheaper master you can get pretty decent results with an automated online mastering service such as Landr, for example.
Before you go you might also want to check out this new post about 3 great mastering plugins that make mastering easier.
I trust this guide on how to master music has been helpful. Happy mastering!
Simplify the Music Production Process with This Easy-to-Follow Checklist and Video Guide

Discover a Step-by-Step Workflow Overview for Electronic Music Production and Beat-Making With This Checklist & Video Workshop Walk-Through. Know How to Finish Tracks and How to Do It on a Consistent Basis!
Grab it and get immediate access below right now!


Learn to understand equalisers and frequencies to supercharge your mixing skills and get results, fast...

New producer? Learn everything you need to produce your first professional track right now...

Would you like to discover the simplest and easiest way to learn music theory as a music producer?
Share this post. Spread the knowledge so other producers can benefit too:
- Renegade Producer
- Music Mastering
- How to Master Music
ⓘ Some pages contain affiliate links so I might earn a commission when you buy through my links. Thanks for your support! Learn more
Get The Video Workshop + Checklist Straight Away:
The Music Production Process Narrowed Down to Just 25 Steps
Keep your eye on the big picture, move forward and finish more tracks you're proud of.

Blog | Newsletter | About | Contact
Disclosure/Disclaimer | Privacy Policy Copyright © 2008-2024 RenegadeProducer.com